If you’re doing any sort of Facebook advertising you need to add your Facebook Pixel to WordPress, otherwise, you are losing out on a massive amount of data.
Options for specific audience targeting and more importantly, remarketing are only available IF you have your Facebook Pixel.
Facebook holds an insane amount of data about anyone on there, so why wouldn’t you want to know all about your potential customers? A Pixel does that. With that data, you can create custom audiences that are going to make your ads budget go a lot further. Pixel is Facebooks version of the Google Analytics code, only Facebook has a lot more data. This is very valuable when marketing your offer or brand.
Prerequisites of this tutorial
- Your website is built on WordPress.
- You have Administrator access.
- You have a Facebook Ads Manager account.
Step 1: Go to Plugins
Like Apps, there is pretty much a plugin for every occasion. On this occasion, you want to go to Plugins > Add New and search for “Insert Headers and Footers”. The top result will be by WPBeginner and the one you want. Install and activate the plugin, then go to Settings > Insert Headers and Footers.
Step 2: Get your base pixel code from Facebook ads manager
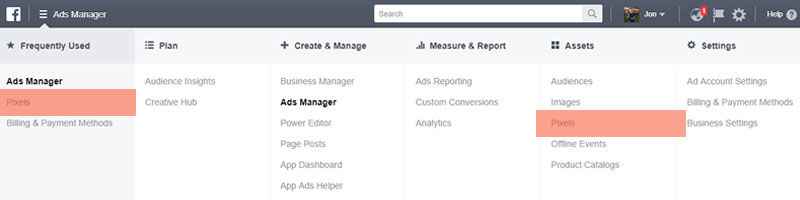
Next step is to get the Pixel code. Open a new browser tab, making sure you are logged into Facebook in the same browser. Now go to Ads Manager: https://www.facebook.com/ads/manager/ and click on Pixels.
Next select Set Up Pixel. Then select Copy and Paste Code. Click on ‘1 Install Pixel Base Code‘ and select all the code in section 1.2.
Step 3: Add the code
Now you have all your Pixel code saved to your computers clipboard, go back to your WordPress site in Settings > Insert Headers and Footers.
In the top box, insert your pixel code so it looks like the below image:
![]()
Once that is in the correct place, which it is very important that it is, click Save at the bottom of the screen. That’s it for the base code 🙂
Step 4: Check the code is working
The easiest way is to install a Chrome extension called Facebook Pixel Helper. Once installed, go to your URL and click on the icon that appears at the top of your browser. You’ll get a list of active Pixels on the page. If that doesn’t work, then there is an issue with the code.
This little extension will tell you if the base Pixel is working and if there are any event Pixels on the page as well, and if they are all working.
For other ways to test, Facebook has this hand tutorial to guide you through https://developers.facebook.com/docs/facebook-pixel/pixel-helper.
Step 5: Event codes
The last step is the most crucial as this extra bit of code tells Facebook if the website visitor has actually converted into a client. Did they do the action you wanted them to do, like buy a product or sign up for your newsletter?
There are a lot of different event types to go through, but today I’m just going through the View Content event. This is the simplest one as it tells Facebook if the content was viewed, i.e. the page loaded.
Event codes, code sits on a single page of the site. So if you want to know how many people read your blog post, put the View Content script at the top of it. You can add it in by, copying the code from Facebook Ads Manager, changing the blue text to suit your needs, going to your blog post, selecting the Text tab, and pasting the Pixel Event code at the very top. Done.
You can test it by going to the blog post on your site normally, like a visitor and checking the Chrome extension we added earlier.
Conclusion
This is a very quick overview of how to add in a Pixel and an Event code. Once this is in you’ll be able to create custom audiences and market to them, instead of wasting money on audiences that are never going to buy from you or use your service.